Thursday, December 22, 2011

Star Cookie Cutter Christmas Tree


Two nights ago, my husband decided he we needed to make something for his coworkers (uh, a little last minute?!!)...and he settled on these Christmas Tree Sugar Cookies.  I purchased a kit several years ago with six different-sized star cookie cutters, but I think you could use 4-6 sizes and still make a lovely tree!


Supplies:
Star-shaped cookie cutters (4-6 different size)
Cream cheese frosting
Green food coloring
Butter knife
Sprinkles or powdered sugar
Paper plate or foil-covered cardboard


1)  Make your favorite sugar cookie dough.  Cut 2-3 stars with each size cookie cutter.  You need to have about 12-18 cookies for each tree.  Bake according to your recipe directions.


2)  Tint the cream cheese frosting green.  Place a dab of frosting on the plate (or cardboard) to stick the largest cookie to the base.  Frost and stack each cookie from largest to smallest rotating each one slightly to achieve a tree shape.


3)  Dust with powdered sugar for a snowy effect.  You can also use sprinkles for a more festive tree!

Labels:

Tuesday, December 20, 2011

Make a Christmas Tree from Hearts

Did you know you can use hearts to make a Christmas tree?  Here's an easy way to do it!

Supplies:


1)  Print or trace the hearts onto construction paper.  Glue the hearts together to form a tree.  Add a rectangle trunk from construction paper.  

2)  To decorate the tree, add sequins, pom poms, stickers, buttons, etc.

Labels: ,

Wednesday, December 14, 2011

Tortilla Christmas Tree Snack

We made these as a healthy snack.  They definitely would've turned out prettier if I had guacamole or cream cheese!  Plus, the decorations would've actually "stuck" to the tree!

Ingredients:
  • Tortilla
  • Guacamole or Cream Cheese
  • Carrots
  • Celery
  • Shredded Cheese


1)  Use kitchen scissors to cut a Christmas tree shape from a tortilla.  A spinach tortilla would have worked best, but I just used what I had!


2)  Spread guacamole or cream cheese mixed with green food coloring on the tortilla.  Add sliced celery and carrots.  Sprinkle with cheese.

Labels:

Monday, December 5, 2011

Gingerbread Boy (or Girl) Puppet

Our town recently held a Gingerbread Festival.  We decided not to attend since my oldest is allergic to milk and eggs (she can't touch the frosting to make one), so I decided to do some of our own gingerbread activities this week!


This simple puppet is fun and comes in very handy for our reading of Gingerbread Baby!


Supplies:

  • Gingerbread pattern (I had one in my files, but you can print a girl or boy here.)
  • Brown paper
  • Scissors
  • Glue
  • Embellishments (buttons, stickers, sequins, wiggly eyes, scrap paper, foam, etc.)


1)  Draw or print a gingerbread boy or girl pattern on brown paper (I cut down construction paper to fit our printer).

2)  Cut out and embellish as desired.

3)  Glue a craft stick handle to the back and use the cut-out as a puppet.


Labels: ,

Wednesday, November 30, 2011

5 Minute Activity: Light-Up Christmas Tree

A friend gave us a Lite Brite she had picked up from a garage sale (thanks, Glenna), and the girls have really enjoyed making all kinds of designs.  I thought this would be a festive idea...

Supplies:


1)  Draw a tree shape on a green piece of construction paper.  Place on the Light Brite and add the colored pegs.

2)  Light up your tree!

Labels: ,

Wednesday, December 22, 2010

12 Days of Christmas Carols and Crafts: Joy to the World


Today's Carol:  Joy to the World
You can find words and music here.
This song is included in Christmas Hymn's for a Kid's Heart

We've come to the end of our 12 Days of Christmas Crafts and Carols!  I can't think of a better song to end with than a triumphant song of hope about the King!

1)  Make a cake (Dad-led cooking project - yay!)

2)  Frost and decorate the cake.

3)  Have a party!  Sing carols, read about Jesus' birth, sing a rousing chorus of Happy Birthday, and eat cake!

Happy birthday, Jesus.  May we never forget to celebrate You.

Labels:

Tuesday, December 21, 2010

12 Days of Christmas Carols and Crafts: Angels from the Realms of Glory


Today's Carol:  Angels from the Realms of Glory
Find words and music here.
This song is included in Christmas Hymns for a Child's Heart.

My oldest daughter made an angel like this at church.  It turned out beautifully, so I'm taking the idea and sharing it with you!

Supplies:
Coffee filter
Cupcake liner
Glue
Markers/crayons
Used envelope
Lid or other circle template
Scissors
Glitter

1)  Fold a coffee filter in half.  Cover the filter with glue and fold in half again.  Glue again and fold in half once more.

2)  Fold a cupcake liner in half and glue on the back of the coffee filter.

3)  On the edge of an envelope, trace a circle.  Be sure not to cut the fold.

4)  Draw a face on the circle.  Glue the angel body on the circle.  Place ribbon or string across the fold.

5)  Glue down the face and allow to dry.  Decorate with glitter, if desired.

Labels:

Monday, December 20, 2010

12 Days of Christmas Carols and Crafts: Deck the Halls


Today's Carol: Deck the Halls
You can find words and music here.
Download a free MP3 here.

Here's a simple way to "deck the halls" (or your table) with a creation by your child.

Supplies:
Votive holder
Acrylic Paint
Q-tips
Tea light
Glue
Salt
1)  Using a Q-Tip, make "dots" all over the candle holder.

2)  Allow to dry.  Place a tea light in the holder.  Very pretty and simple....or you can move on to the next step.

3) Smear the outside of the glass with a thick coat of glue. Be careful not to scrape off any painted dots.  Roll or sprinkle with salt.

4)  Allow to dry completely.  Place a tea light in the votive holder.

I can't quite capture the effect, but they really do look quite festive!  And all for under $1 a piece!

handmade projects

Labels:

Friday, December 17, 2010

12 Days of Christmas Carols and Crafts: Rockin' Around the Christmas Tree

Today's SongRockin' Around the Christmas Tree
Find words and music here.

Need a quick gift bag?  Your child can easily make this Christmas Tree sack!

Supplies:
Paper sack
Green construction paper
Scissors
Glue
Stickers

1)  Draw and cut-out a Christmas tree shape.  Glue to the paper sack.

2)  Cover with stickers. 

We used office supply color-coding dots for our trees! 

Labels:

Wednesday, December 15, 2010

12 Days of Christmas Carols and Crafts: O Little Town of Bethlehem


Today's Carol:  O Little Town of Bethlehem
You can find words and music here.
*This song is included in Christmas Carols for a Kid's Heart.
You need:
Thin cardboard or cardstock
Scissors
Glue
Tissue paper
Ornament hook or ribbon

1)  Cut two triangles out of thin cardboard or cardstock.

2)  Glue the triangles together to form a star.

3)  Cover with glue.  Crumple tissue paper and place on the star.

4)  Poke a hole with a thumbtack and hang with an ornament hook!

Labels:

Tuesday, December 14, 2010

12 Days of Christmas Carols and Crafts: O Come All Ye Faithful

Today's Carol:  O Come All Ye Faithful
You can find words and music here.
*Download a free MP3 here.
*This song is included in Christmas Carols for a Kid's Heart.
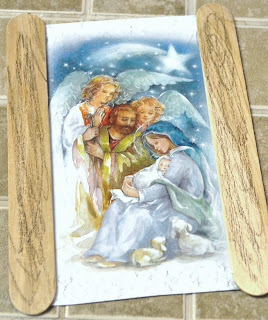
Recycle a Christmas card with this craft!

You need:
Card with Nativity scene
Six craft sticks
Crayons or markers
Glue


1)  Lay out the craft sticks to form a frame.  This gives you a guide for the size to cut the card.  Cut the card.

2)  Color the craft sticks (if desired).  Glue on the sides.

3)  Glue the top and bottom sticks.  Allow to dry.

4)  Form a triangle at the top and glue on the last two sticks.

I prefer to use the jumbo craft sticks with preschoolers, but older children could do this as well with the smaller sticks!

Labels:

Monday, December 13, 2010

12 Days of Christmas Carols and Crafts: Hark! The Herald Angels Sing

Today's Carol:  Hark! The Herald Angels Sing
You can find words and music here.
*Download a free MP3 here.
*This song is included in Christmas Carols for a Kid's Heart.

These handprint (and footprint) angel towels would make a great gift!

You need:
Dish towel
White acrylic or fabric paint
Paint brush
Paper
Milk lid
Scissors

1)  Cover foot with white paint.  Step on the towel.

2)  Paint right hand white.  Hold fingers together and press onto the left side of the foot.  Paint left hand white and press onto the right side.

 3)  Trace a milk jug lid onto paper.  Cut out the inside to make a stencil.  Use a sponge or brush to paint the head.  Add a halo if desired.

Allow to dry overnight before using the towel.

(My six-year-old wants you to know that she was the photographer today.  She got a little picture happy, and when I uploaded them there were over 60 photos!)

Linking up to Homeschool Creations:  Preschool Corner!

Labels:

Thursday, December 9, 2010

12 Days of Christmas Carols and Crafts: Silent Night (Edible "Gingerbread" Nativity)


 Today's Carol: Silent Night 
You can find words and music here.
*This song is included in Christmas Carols for a Kid's Heart

*Download a free MP3 here.

You need:
Cereal box
Graham crackers
Frosting
EL Fudge cookies or Nutter Butters
Fruit Roll-Up
Decorated star-shaped cookie
Animal crackers
Pretzel twists
Shredded coconut
Marshmallow
Yellow food coloring (if desired)
Plate
Spoon or butter knife


1)  Cut off the bottom of a cereal box.  Cut in thirds and use the ends.  Use one to form a stable.  Place on a plate.

2)  Dab frosting on one square of graham cracker.  Attach to one side of the box.  Complete the other sides.

3)  Place a dab of frosting on the bottom sides to "glue" it to the plate.  Add two EL Fudge cookies or Nutter Butters in front of the stable (use frosting to stick them to the plate).  If using Nutter Butters, frost the cookie and decorate for Mary and Joseph.  If using EL Fudge cookies, drape one cookie with a Fruit Roll-Up for Mary.

4)  Form pretzels in a manger shape.  Add coconut for hay.  For yellow hay, toss coconut in a plastic bag with food coloring and shake.

5)  Dab frosting on the animal crackers and add them to the scene.  Add a star to the top of the stable.

6)  If desired, place a marshmallow in the manger for a swaddled Baby Jesus.

This activity was adapted from an idea in the December 2000 issue of  Children's Ministry Magazine
I'm sharing this idea at Raising Memories:  Christmas Sharing Time
I'm sharing this idea at Homeschool Creations:  Preschool Corner

Labels: